
By Muskan Nande –
Dependency injection (DI) is a technique widely used in programming and well suited to Android development, dependencies are provided to a class instead of creating them itself. The dependency injection principle states that entities must depend on abstraction not on concretions. It is a process of constructing required dependencies outside of the dependent object and providing them to the dependent object when needed.
DI principles help in doing the groundwork for good app architecture, greater code reusability, and ease of testing.
If we talk in Layman’s terms, we have a class called Engine, which needs Fuel to do its work, so here Engine class is dependent on Fuel class, these required classes are known as dependencies.

Hilt provides a standard way to use DI in applications by providing containers for every android class in your project and managing their life cycles automatically. The hilt is built on top of the compile-time correctness, runtime performance, scalability, and Android Studio supported by Dagger.
Due to the amount of boilerplate code and the difficulty level of implementation in the current DI libraries, the Android team has come up with Hilt.
“Hilt is a simplified form of Dagger for DI in Android apps with many more benefits.”
The benefits of hilt are:
- Reduce boilerplate
- Decoupled Build Dependencies
- Simplified Configuration
- Improve testing
Hilt Annotation
@HiltAndroidApp : Applying these annotations to the application class, It will trigger the Hilt code generation and in the process will create our App Component. It is the parent component of the app, which means It is the parent component of the app, which means all the provided dependencies will be accessible by other components as well.
@HiltAndroidApp
Class MyApplication : Application() { . . . }
@AndroidEntryPoint : Using this annotation, hilt will generate a DI container for each android component, so respective components can add dependencies. This annotation needs to be applied to the Android components like fragments, activities, etc.
To inject the dependencies, if the android class is annotated with @AndroidEntryPoint, then annotations of Android Classes are also to be made that depend on it. For example, if a fragment is annotated, then each & every activity is also to be annotated where the particular fragment is used.
@AndroidEntryPoint
class MyActivity : AppCompatActivity(){ . . . }
Hilt currently supports – :
- Android classes Activity
- Fragments
- View
- Service
- BroadcastReciever
@Inject : This annotation is used to perform the injection. It is used to inject the dependencies into dependent classes. The dependencies can be injected through a constructor, field or method.
Field Injection – In field injection, dependencies are instantiated after the class is created.
@AndroidEntryPoint
class MyApplication : AppCompatActivity(){
@Inject lateinit var analytics : Analytics
}
Constructor Injection – Constructor Injection is the act of statically defining the list of required Dependencies by specifying them as parameters to the class’s constructor.
class SampleAdapter @Inject constructor(
private val service : SampleService
){ . . . }
@HiltViewModel : It will create a dependency for ViewModel and Hilt will return that later, with the help of this annotation, we can provide instances of viewModel in the entire application.
Class MyViewModel @Inject constructor(
Private val analytics : AnalyticsAdapter
Private val savestate : SavedStateHandler
) : ViewModel { . . . }
@Module : It is used to create an object for any component dependency, mostly used for the third party or where constructor and field injection cannot be performed. Tell hilt that this is a module.
@InstallIn: Installin tells the container where the bindings are. @Installn (ActivityComponent::class) helps activity component class’s dependency to inject via hilt. This annotation means that all of the dependencies in this Module are available in all of the app’s activities.
@Module
@InstallIn(SingletonComponent.class)
class FooModule {
@Provides
static Bar provideBar() {…}
}
@Singleton : It will create a singleton instance for a dependency, which will be shared across the application. This makes the application container always provide the same instance regardless of whether the type of dependencies we are using is the same or a different one.
@Singleton
class AnalyticAdapter @Inject constructor(
private val service : AnalyticsService
) { . . . }
@EntryPoint : @EntryPoint annotation which is used to inject dependencies in classes not supported by Hilt, it comes with support for the most common Android components. However, there might be a need to perform manual field injection in classes which either are not supported directly by Hilt or cannot be used by Hilt.
For example, Hilt doesn’t directly support content providers. If a content provider is used to get some dependencies, it’ll be necessary to define an interface that is annotated with @EntryPoint for each binding type and include qualifiers.
next is adding @InstallIn to specify the component to install the entry point :
class ExampleContentProvider : ContentProvider() {
@EntryPoint
@InstallIn(SingletonComponent::class)
interface ExampleContentProviderEntryPoint{
fun analyticsService(): AnalyticsService
}
. . .
}
Hilt Implementation
- Add the hilt-android-gradle plugin to the project’s root build.gradle file:
Buildscript {
. . .
dependencies {
. . .
classpath(“com.google.dagger:hilt- android-gradle-plugin: :2.38.1 “)
}
}
2. Then, apply the Gradle plugin and add these dependencies in the app/build.gradle file:
apply plugin: ‘Kotlin-Kapt’
apply plugin: ‘dagger.hilt.android.plugin’
android {
// As Hilt uses Java 8 features, enable Java8 in app
compileOptions {
sourceCompatibility JavaVersion.VERSION_1_8
targetCompatibility JavaVersion.VERSION_1_8
}
}
dependencies {
implementation “com.google.dagger:hilt-android:$hilt_version”
kapt “com.google.dagger:hilt-compiler:$hilt_version”
}
Hilt in Action
To tell Hilt how to provide instances of a type, add the @Inject annotation to the constructor of the class you want to be injected. The information that Hilt has related to providing instances of different types is also called bindings.
Class ExampleClass @Inject constructor(){
fun doSomeWork() {
Log.d(“HiltApp”, “Do some work”)
}
}
//Injecting the above ExampleClass into application
@HiltAndroidApp
class ExampleApplication : Application() {
@Inject
lateinit var exampleClass: ExampleClass
@Override public void onCreate() {
super.onCreate(); // Injection happens in super.onCreate()
// Use exampleClass
}
}
Once hilt has enabled members injection in the application, Initialize the process of enabling members injection in our other Android classes using the @AndroidEntryPoint annotation.
@AndroidEntryPoint
class SampleActivity : BaseActivity() {
@Inject
lateinit var exampleClass: ExampleClass
override fun onCreate() {
// Injection happens in super.onCreate().
super.onCreate()
. . .
}
}
Modules in Hilt
To make something injectable in Hilt, manual instruction will be needed for Hilt on how to create an instance of that particular thing. These instructions are called bindings.
A Hilt module can be thought of as a collection of “recipes” that tell Hilt how to create an instance of something that doesn’t have a constructor — such as an interface or a system service.
In addition, any module can be replaced in the tests with a different module. This makes it easy to replace interface implementations with mocks, for example.
Modules are installed in a Hilt component specified using the @InstallIn annotation.
Binds
While using this method, the class and function created must be abstract. According to the component given in @InstallIn Annotation, Scope convenient should be given for the function.
@InstallIn(SingletonComponent::class)
@Module
abstract class MyModule {
@Singleton
@Binds
abstract fun bindingFunction(myImplementor: MyInterfaceImplementor) : MyInterface
}
Provides
This annotation tells hilt that the function provides an object of return data type. This is the method Android wants an individual to use also (in my opinion) it is easier than the previous method. All that needed is to make realise the function that it will return an Interface and that interface will be the Implementor we created earlier.
@InstallIn(ActivityComponent::class)
@Module
class MyModule {
@ActivityScoped
@Provides
fun providerFunction() : MyInterface {
return MyInterfaceImplementor()
}
}
Hilt component
Each module is installed inside a Hilt component, specified by using @InstallIn().The module’s component is primarily used to prevent accidental Injection of a dependency in the wrong place.
For example, @InstallIn(ServiceComponent.class) would prevent bindings and providers in an annotated module from being used in an activity, with hilt we don’t need to explicitly create a component interface.
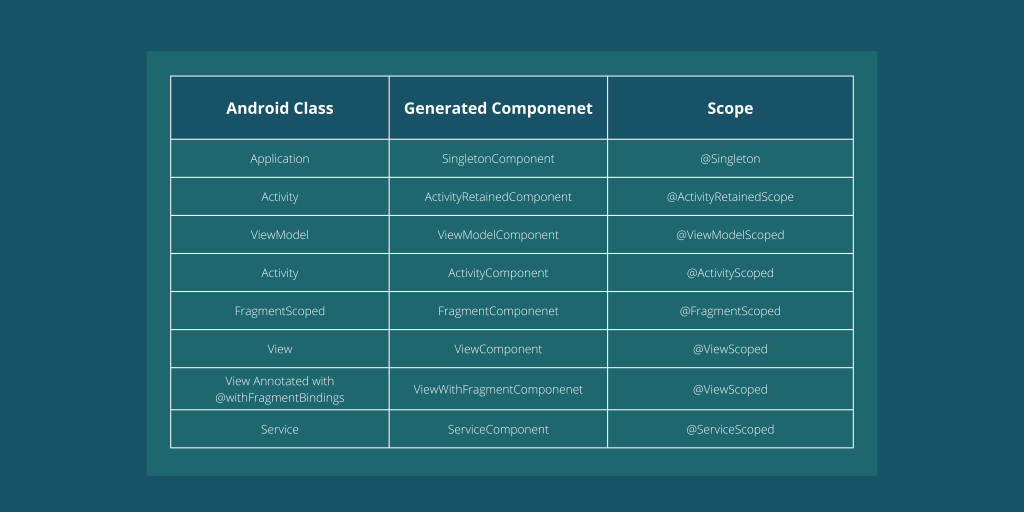
Hilt library has seven different component interfaces:

Component Scope
The scope is not an annotation that we have to use, Hilt allows a binding to be scoped to a particular component. Hilt only creates a scoped binding once per instance of the component that the binding is scoped to, and all requests for that binding share the same instance
 For example, If there is a need for an application-wide singleton UserManager instance, @Singleton annotation must be used.
@Singleton
class UserManager @Inject Constructor(){
}
If there is a need for activity-scoped or fragment-scoped singleton UserManager instances, @ActivityScoped or @FragmentScoped annotation must be used respectively.
@FragmentScoped
class UserManager @Inject constructor(){
}
Conclusion
In my opinion, it makes the process of dependency injection in android easier, since it helps in generating most of the boilerplate codes by itself, helps in saving a lot of time. Also, it’s a simplified version of Dagger2 because it provides compile-time correctness, runtime performance and scalability, so it helps do the work more efficiently.


Leave a comment