By – Milson Banjare
In today’s development era, we are already aware of REST API web services for data communication between the server and client-side applications but in the same environment, there are some other web services API like SOAP (Simple Object Access Protocol) which was created around 2 decades ago. The XML we used to make requests and receive responses in SOAP can become extremely complex. In some programming languages, you need to build those requests manually, which becomes problematic because SOAP is intolerant of errors. However, other languages can use shortcuts that SOAP provides. They can help you reduce the effort required to create the request and parse the response. In fact, working with .NET languages, you’ll never even see the XML.
Part of the magic is the Web Services Description Language (WSDL). This is another file that’s associated with SOAP. It defines how the web service works so that when you create a reference to it, the IDE can completely automate the process. So, the difficulty of using SOAP depends to a large degree on the language you use.
There is a point when everyone struggles with XML request and response handling, lot of things to figure out like How to mold SOAP XML response into our modal class? and How to add headers and subheaders in request XML? This is all because of fewer detailing examples over the internet. With some research and practice, It’s easy to understand the correct way of XML request/response handling by using Retrofit, it’s old but still relevant. To get more successful results, using the SimpleXML framework is an option that works better with XML because it requires comparatively less coding, that means it is already integrated with Retrofit2, so you don’t need to include it separately in your project, just use Retrofit Converter.
As they say, half a knowledge is always harmful, so let’s understand the terminologies in layman’s terms.
RETROFIT
Well, Now a day’s most developers use Retrofit. It is a type-safe HTTP networking library used for Android and Java. It has become even better since it’s super fast, offered better functionality, has simple syntax, easy to configure and most approachable amongst developers. That is the reason most of the developers are now switched to using Retrofit to make API requests.
The main advantage of using Retrofit in Android Programming is that you don’t need to traverse the whole response all by yourself to create an object and then use it, instead, Retrofit does this for us and all we need to do is to set the Retrofit call that how our response object would be. In retrofit ” Converter Factory ” play’s a very important role. It converts the whole response into an object automatically. All you need to do is to set the correct Converter Factory in your retrofit Object.
The good features are -:
- Easy to connect to web services by translating the API into Java or Kotlin.
- Easy to add Headers and request types.
- Easily Customisable, you can customize it and add any convertors like Gson, XML, etc. You can also customize it to add different interceptors and cache.
- It provides functionalities such as custom headers, file uploads, downloads, etc.
To work with Retrofit following three classes are needed:
- A model class that is used as a JSON model
- An interface that defines the HTTP operations needs to be performed
- Retrofit.Builder class: Instance which uses the interface defined above and the Builder API to allow defining the URL endpoint for the HTTP operations. It also takes the converters we provide to format the Response.
SOAP
Simple Object Access Protocol is a standards-based web services access protocol that has been around for a long time. Originally it was developed by Microsoft, With the SOAP-XML feature, we were able to reduce the API attack because it admits only those request who adheres to the schema declared in the provided WSDL file or an additional schema file. \
When we compare SOAP XML vs REST. It holds the following advantage over the REST like -:
- Language, platform & transport-independent [HTTP required to use REST].
- Works well in distributed enterprise environments [Direct point-to-point communication for REST].
- Built-in error handling.
- Standardized.
- Automated.
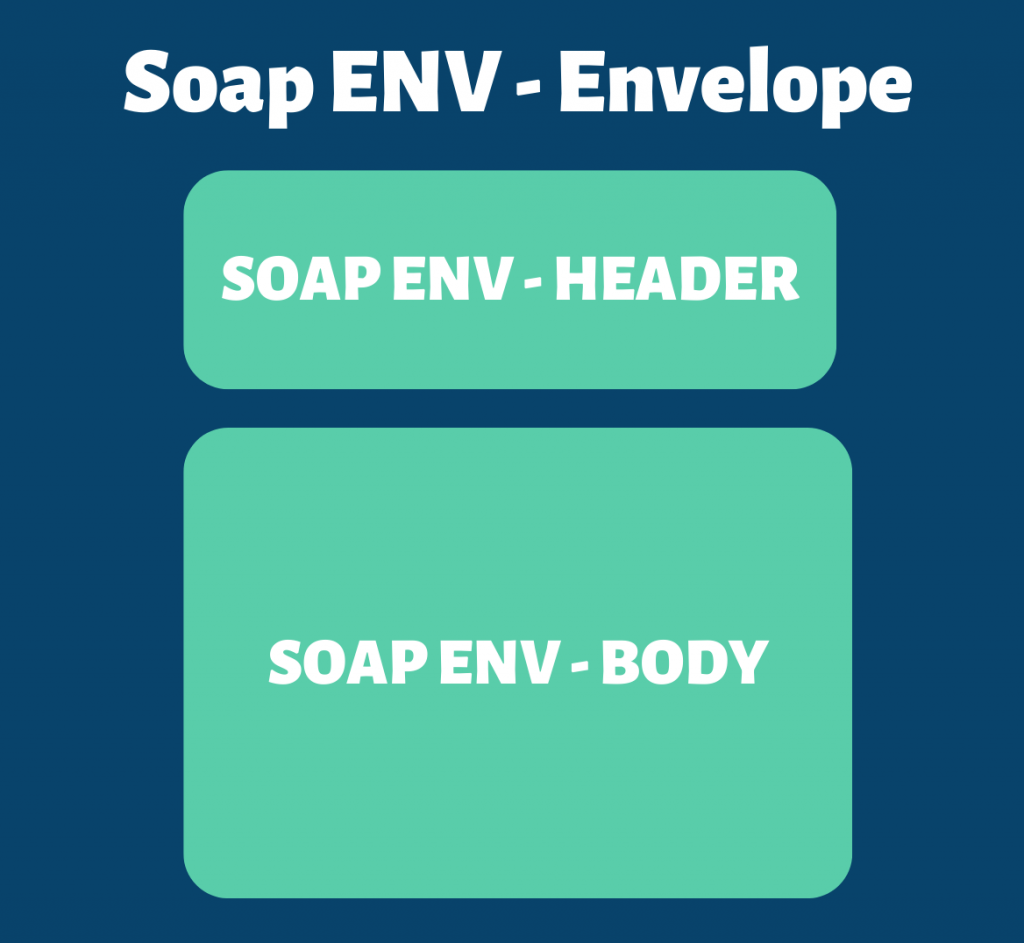
Building blocks of SOAP XML.
- The SOAP Envelope encapsulates all the data in a message and identifies the XML document as a SOAP message.
- The Header element contains additional information. This information could be authentication credentials.
- The Body element holds the call and response information sent from the web service to the calling application.
 Talking of the implementation part..
SimpleXMLConverter is used with Retrofit2 in Kotlin android. To understand with the help of an example, a short demo is listed below -:
Adding some dependencies to the build.Gradle (:app) file
implement “com.squareup.retrofit2:converter-simplexml:2.9.0”
implement ‘org.simpleframework:simple-xml:2.7.1′
Below is the XML request sample .
[ requestBodyXmlText string variable holds the request XML format for SOAP API call. Header and Subheader tags are included to show you, how and where we can write or add the header and sub header contents inside the variable. ]
val requestBodyXmlText = “<?xml version=\”1.0\” encoding=\”UTF-8\”?>\n” +
“<soapenv:Envelope xmlns:soapenv=\”http://schemas.xmlsoap.org/soap/envelope/\” \n” +
“\txmlns:sch=\”http://schemas.xmlsoap.org/soap/envelope/”>\n” +
” <soapenv:Header>\n” +
” <Security”><!– Optional –></Security>\n” +
” <sch:ReqHeader>\n” +
” <sch:SessionID>” + Value of sessionId + “</sch:SessionID>\n” +
” </sch:ReqHeader>\n” +
” </soapenv:Header>\n” +
” <soapenv:Body> \n” +
“\t\t<GetEmpInformation xmlns=\”https://www.w3schools.com/transaction/”> \n” +
“\t\t\t<EmpId>” + Value of Employee Id + “</EmpId> \n” +
“\t\t\t<Organization>” + Value of Orgationid + “</Organization> \n” +
“\t\t</GetEmpInformation> \n” +
“\t</soapenv:Body> \n” +
“</soapenv:Envelope>”
Convert XML SOAP response [ Below is XML response format ]
<?xml version=”1.0″ encoding=”UTF-8″?>
<soapenv:Envelope xmlns:soapenv=”http://schemas.xmlsoap.org/soap/envelope/”>
<soapenv:Header>
<sch:RspHeader xmlns:sch=”http://schemas.xmlsoap.org/schema”>
<sch:SessionID>8956abc_test</sch:SessionID>
</sch:RspHeader>
</soapenv:Header>
<soap-env:Body xmlns:soap-env=”http://schemas.xmlsoap.org/soap/envelope/“>
<info:Employee xmlns:info=”http://schemas.xmlsoap.org/schema”>
<info:InfoDetails>
<sch:Name
xmlns:sch=”http://schemas.xmlsoap.org/schema”>Student</sch:Name>
<sch:Age
xmlns:sch=”http://schemas.xmlsoap.org/schema”>30</sch:Age>
</info:InfoDetails>
</info:Employee>
</soap-env:Body>
</soapenv:Envelope>
Converting XML response into model classes.
This approach requires additional configuration for your POJOs. To prepare your model/pojo classes for the response object, we need to understand well about the building blocks of SOAP XML. From the above example we have found <soapenv:Envelope> is outer tag , <soapenv:Header> and <soap-env:Body> are its elementary tags .
basic diagram for your XML response would be like this:
<soapenv:Envelope> => EmployeeInfoXmlResponse (Pojo/model class).
|—-> <soapenv:Header> => HeaderElement (Pojo/model class).
|—-> <sch:RspHeader> => GeneratedRspHeader (Pojo/model class).
|—-> <soap-env:Body> => BodyElement (Pojo/model class).
|—-> <info:Employee> => Employee (Pojo/model class).
|—-> <info:InfoDetails> => InfoDetails (Pojo/model class).
Let’s have a detailed definition for these above classes in kotlin.
@Root(name = “soapenv:Envelope”, strict = true)
@NamespaceList(
Namespace(prefix = “soapenv”, reference = “http://schemas.xmlsoap.org/soap/envelope/“)
)
data class EmployeeInfoXmlResponse @JvmOverloads constructor(
@field:Element(name = “Header”, required = false)
@param:Element(name = “Header”, required = false)
var headerElement: HeaderElement? = null,
@field:Element(name = “Body”, required = false)
@param:Element(name = “Body”, required = false)
var bodyElement: BodyElement? = null
)
/* @JvmOverloads
Instructs the Kotlin compiler to generate overloads for this function that substitute default */
Lets define classes for HEADER and its content.
@Root(name = “soapenv:Header”, strict = true)
data class HeaderElement @JvmOverloads constructor(
@field:Element(name = “RspHeader”, required = false)
@param:Element(name = “RspHeader”, required = false)
var generatedRspHeader: GeneratedRspHeader? = null
)
While defining HeaderElement class another tag that is <sch:RspHeader> inside the </soapenv:Header> so we will have to create another new model class GeneratedRspHeader
@Root(name = “sch:RspHeader”, strict = true)
@Namespace(prefix = “sch”, reference = “http://schemas.xmlsoap.org/schema“)
class GeneratedRspHeader @JvmOverloads constructor(
@field:Element(name = “SessionID”, required = false)
@param:Element(name = “SessionID”, required = false)
var sessionID: String? = null
)
Moving forward , lets define all classes for BODY and its content.
@Root(name = “soap-env:Body”, strict = true)
@NamespaceList( Namespace(prefix = “soap-env”, reference = “http://schemas.xmlsoap.org/soap/envelope/“))
class BodyElement @JvmOverloads constructor(
@field:Element(name = “Employee”, required = false)
@param:Element(name = “Employee”, required = false)
var employee: Employee? = null
)
/* @NamespaceList
is used when we have multiple namespaces inside a tag */
Similarly, we have found <info:Employee> tag inside its parent <soap-env:Body> tag, so we need to create another model class Employee
@Root(name = “info:Employee”, strict = true)
@NamespaceList( Namespace(prefix = “info”, reference = “http://schemas.xmlsoap.org/schema“))
class Employee @JvmOverloads constructor(
@field:Element(name = “InfoDetails”, required = false)
@param:Element(name = “InfoDetails”, required = false)
var infoDetails: InfoDetails? = null
)
Now for tag <info:InfoDetails> we created a model class InfoDetails
@Root(name = “info:InfoDetails”, strict = false)
class InfoDetails @JvmOverloads constructor(
@NamespaceList(
Namespace(prefix = “sch”, reference = “http://schemas.xmlsoap.org/schema“)
)
@field:Element(name = “FullName”, required = false)
@param:Element(name = “FullName”, required = false)
var fullName: String? = null,
@NamespaceList(
Namespace(prefix = “sch”, reference = “http://schemas.xmlsoap.org/schema“)
)
@field:Element(name = “Age”, required = false)
@param:Element(name = “Age”, required = false)
var age: String? = null
)
Yes, we have done with all model classes definitions.
After that, last and final steps is Retrofit config. It may look like this
val strategy = AnnotationStrategy()
val serializer = Persister(strategy)
return Retrofit.Builder()
.baseUrl(getBaseUrl(true))
.addConverterFactory(SimpleXmlConverterFactory.createNonStrict(serializer))
.client(client)
.build()
interface APIService {
@Headers (“Content-Type: text/xml”)
@POST (“/employee”)
suspend fun getEmployeeDetail(@Body requestBody: RequestBody): Response<EmployeeInfoXmlResponse>
}
It’s time to create a Retrofit request for api calling.
The focusable part is that we should match the request xml as it is after supplying the required data. The XML text below is a string type.
val requestBodyXmlText = “<?xml version=\”1.0\” encoding=\”UTF-8\”?>\n” +
“<soapenv:Envelope xmlns:soapenv=\”http://schemas.xmlsoap.org/soap/envelope/\” \n” +
“\txmlns:sch=\”http://schemas.xmlsoap.org/soap/envelope/”>\n” +
” <soapenv:Header>\n” +
” <Security”><!– Optional –></Security>\n” +
” <sch:ReqHeader>\n” +
” <sch:SessionID>” + Value of sessionId + “</sch:SessionID>\n” +
” </sch:ReqHeader>\n” +
” </soapenv:Header>\n” +
” <soapenv:Body> \n” +
“\t\t<GetEmpInformation xmlns=\”https://www.w3schools.com/transaction/”> \n” +
“\t\t\t<EmpId>” + Value of Employee Id + “</EmpId> \n” +
“\t\t\t<Organization>” + Value of Orgationid + “</Organization> \n” +
“\t\t</GetEmpInformation> \n” +
“\t</soapenv:Body> \n” +
“</soapenv:Envelope>”
val requestBody = requestBodyXmlText.toRequestBody(“text/xml”.toMediaTypeOrNull())
var apiService: ApiService = retrofit.create(ApiService::class.java)
var call: Call<EmployeeInfoXmlResponse> = apiService.getEmployeeDetail(requestBody)
var response: Response<EmployeeInfoXmlResponse> = call.execute()
// response.code() == 200
var xmlResponseModel: EmployeeInfoXmlResponse? = response.body()
Voila! Let’s compile and hit the API call, after a successful response we will receive a response as a data type EmployeeInfoXmlResponse.
Stay Tuned For More!!


Leave a comment